반응형


ES6

자바스크립트를 표준화하기 위해 만들어진 스크립트 프로그래밍 언어


1.  let, const, var

기존 변수 선언 방식

var 재정의 가능하고 재선언도 가능하다. 단점은 코드 관리 측면에서 let에 비해 부적합함.


ES6 변수 선언 방식

let 가변변수로 재정의가 가능하지만 재선언은 불가능

const 불변변수로 재선언과 재정의 모두 불가능합니다.

var x = 2
let y = 2;
const z = 2;

// 재정의
x = 4; // posible
y = 4; // posible
z = 4; // error

// 재선언
var x = 3 // posible
let y = 3; // error
const z = 3; // error


document.write(x);
document.write(y);
document.write(z);


2. 모듈화 Import - Export

모듈

프로젝트 규모가 커질수록 관리하기 편하게 모듈화 한다.

여러 기능들에 관한 코드가 모여있는 하나의 파일로 다음과 같은 것들을 위해 사용한다.


모듈화의 장점

- 유지보수성: 모듈화되면 의존성이 줄어들어, 개선하거나 수정할 때 편하다.

- 네임스페이스화: 전역변수가 저장된 전역공간과 분리되어 저장됨.

- 재사용성: 똑같은 코드를 반복하지 않고 모듈을 불러다 사용할 수 있다.


모듈화 적용하기

moduleA.js : default export 사용해서 내보낸 모듈A

const A = () => {};
export default A;

moduleB.js :  named export로 내보낸 모듈B는 사용할 때 중괄호 { }로 불러야 함.

export const B = () => {};

index.js

import A from 'moduleA';
import { B } from 'moduleB';


3. 템플릿 리터럴


Template literals
템플릿 리터럴은 내장된 표현식을 허용하는 문자열 리터럴로 런타임 시점에 일반 자바스크립트 문자열로 처리/변환된다.
표현식/문자열 삽입, 여러 줄 문자열, 문자열 형식화, 문자열 태깅 등 다양한 기능을 제공
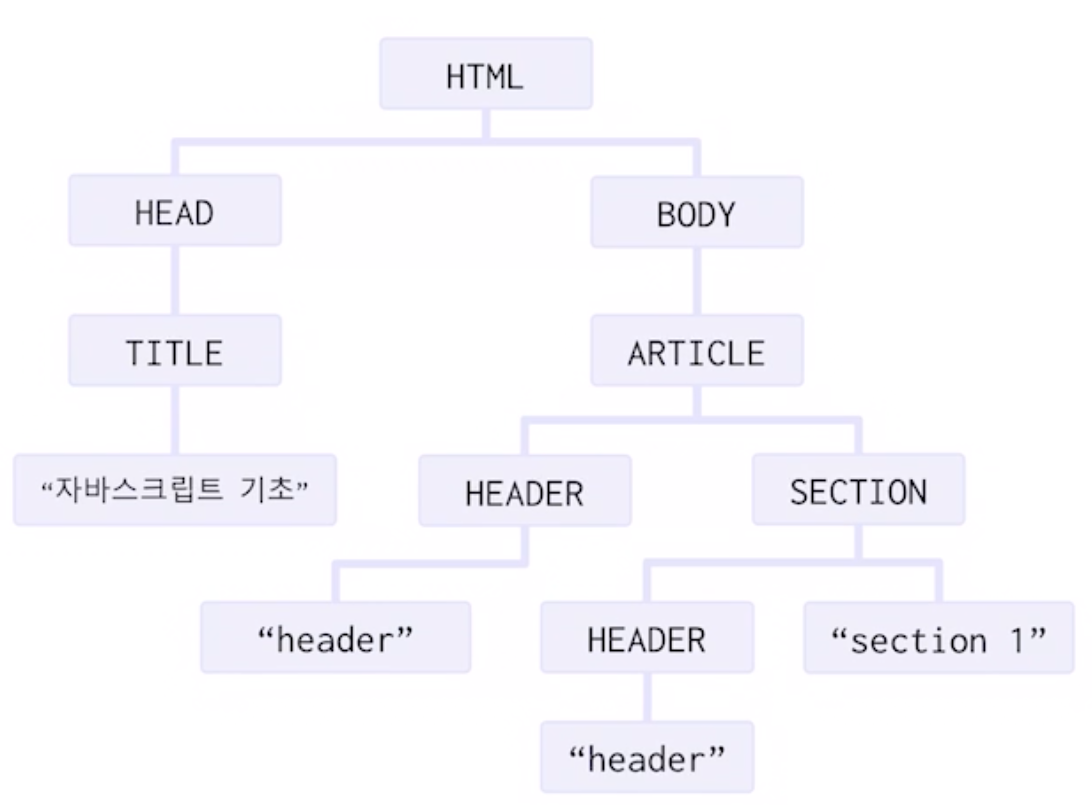
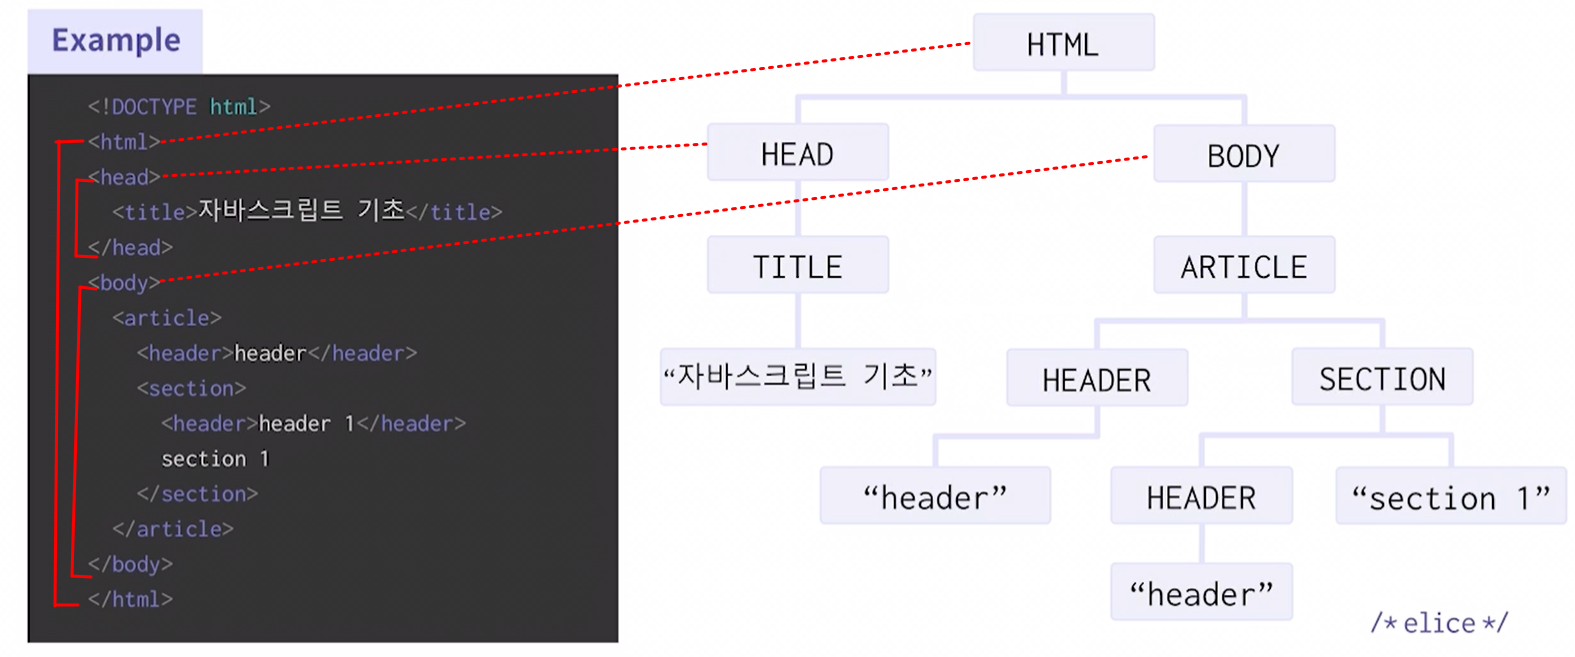
프론트엔드에서HTML을 데이터와 결합해서 DOM을 다시 그려야 하는 일이 빈번하기 때문에, 템플릿을 좀 더 쉽게 편집하고 작성해야 할 필요성으로 등장하였다.


기존 문자열 사용 방식

+ 기호 사용


ES6 문자열 사용 방식

템플릿 리터럴은 작은따옴표(')나 큰따옴표(") 대신 백틱(`)(grave accent)로 감싸준다.

$와 중괄호{}를 사용하여 표현식을 표기할 수 있다.

var variable = "변수";

console.log(`이건 ${variable}입니다.`);


* enter 줄바꿈 인식함.

* escapte문자 (/) 필요없음.


4. 화살표 함수

기존 함수 선언 방식

function 함수 명(인자) {
	// 코드 선언

}

ES6 함수 선언 방식 

(1) 화살표 함수(arrow function) 

함수 표현식(ES5)보다 단순하고 간결한 문법으로 함수를 만들 수 있는 방법

// ES5
var pow = function (x) { return x * x; };
 
// ES6
const pow = x => x * x;


화살표 함수 선언 방식

    () => { ... } // 매개변수가 없을 경우
     x => { ... } // 매개변수가 한 개인 경우, 소괄호를 생략할 수 있다.
(x, y) => { ... } // 매개변수가 여러 개인 경우, 소괄호를 생략할 수 없다.

참고 링크


this 


(1) 기존 일반 함수(ES5) 내에서의 this

일반 함수(ES5)로 정의한 함수 내에서 this는 전역객체를 가리킨다.

아래 코드에서 this.title을 출력하면 window를 this로 참조하기 때문에 group의 title을 못가져 온다.

let group = {
  title: "1모둠",
  students: ["보라", "호진", "지민"],
 
  showList() {
    this.students.forEach( // this === group
      function(student) { alert(this.title + ': ' + student) } // this ==== window
    );
  }
};
 
group.showList();
 
// undefined : 보라
// undefined : 호진
// undefined : 지민

(2) 화살표 함수(ES6) 내에서의 this

화살표 함수로 정의된 스코프 내에는 this가 존재하지 않는다.

따라서 this로 접근하면 상위 스코프를 가리킨다. 

아래 코드에서 this.title을 출력하면 상위 this(여기선 group)를 참조하기 때문에 group의 title을 가져올 수 있게 된다.

/* 화살표 함수로 쓸 경우 */
/* 화살표 함수의 this는 상위의 this를 그대로 가져온다. */
 
let group = {
  title: "1모둠",
  students: ["보라", "호진", "지민"],
 
  showList() {
    this.students.forEach( // this === group
      student => alert(this.title + ': ' + student) // this === group
    );
  }
};
 
group.showList();
 
// 1모둠 : 보라
// 1모둠 : 호진
// 1모둠 : 지민

참고링크


5. 클래스


기존 클래스 선언 방식: function

class가 없을 땐 function 키워드와 prototype 속성을 이용해 클래스를 구현해야 했다.

function Model(name, age) {
	this.name = name
    this.age = age
}

// class가 없을 땐 prototype으로 클래스를 구현해야 했다.
Model.prototype.getInfo = function() {
	console.log(this.name, this.age)
}

// 선언은 new로
var model = new Model('elice', 5)
model.getInfo()


ES6 클래스 선언 방식: class


Class  

Class 등장 이후, 프로토타입 없이도 클래스 내부에 변수 뿐만 아니라 함수도 선언 가능해졌다.

아래 코드는 Model이라는 클래스를 생성하고, 생성자(Constructor)로 정의한다.

또한 클래스 내에 정의한 메서드 getInfo()는 프로토타입에 저장된다.

// class 내부에 변수 뿐만 아니라 함수도 선언 가능해졌다.
class Model {
    constructor(namem age) { 
        this.name = name; 
        this.age = age;
    }
    getInfo() { 
    	console.log(this.name, this.age);
    }
}

// 선언은 new로
const model = new Model('elice', 5);
model.getInfo();

 참고 링크


6. forEach ( ) 

forEach ( 함수 )

반복작업을 가능하게 한다.

즉, 배열 요소 각각에 대해 함수를 반복실행할 수 있다.


기존 for 반복문

var fruits = ["apple", "orange", "cherry"];

function myFunction(item, index) {
  document.write(index + ":" + item + "<br>");
}

for (i = 0; i < 3; i++) {
  document.write(i);
  document.write(":" + fruits[i] + "<br>");
}

// 출력
// 0:apple
// 1:orange
// 2:cherry


arr.forEach(function() {  }) 사용

var fruits = ["apple", "orange", "cherry"];

function myFunction(item, index) {
  document.write(index + ":" + item + "<br>");
}

fruits.forEach( function (item, index) {
    myFunction(item, index)
})


arr.forEach(화살표 함수) 사용

var fruits = ["apple", "orange", "cherry"];

function myFunction(item, index) {
  document.write(index + ":" + item + "<br>");
}

fruits.forEach((item, idx) => {
    myFunction(item, idx)
})


7. map( ) 

map( ) 

배열을 변형하거나 재정렬하는 메서드


Object.map(함수)

var persons = [
  { firstname: 'Malcom', lastname: 'Reynolds' },
  { firstname: 'Kaylee', lastname: 'Frye' },
  { firstname: 'Jayne', lastname: 'Cobb' },
];

function getFullName(item) {
  var fullname = item.firstname + ' ' + item.lastname + '<br>';
  document.write(fullname);
}

persons.map(getFullName);

// 출력
// Malcom Reynolds
// Kaylee Frye
// Jayne Cobb

Array.map(함수)

var numbers = [4, 9, 16, 25];
var x = numbers.map(Math.sqrt);
document.write(x);

// 출력
// 2,3,4,5


8. reduce ( ) 


reduce

forEach 처럼 반복작업을 한다는 점은 비슷하나, 배열을 기반으로 값 하나를 도출할 때 사용한다. 

map은 각각의 요소를 변형시킨다면, reduce는 배열 자체를 변형시킨다.


Array. reduce(누적값, 현잿값, 인덱스, 요소) => { return 결과 }, 초기값);

함수의 인자는 총 4개를 가진다.

1. 누산기(Accumulator)

2. 현재값(Current)

3. 현재 인덱스(Index)

4. 원본배열(Source)


var numbers = [175, 50, 25];
document.write(numbers.reduce(myFunc));

function myFunc(total, num, index, arr) {
    document.write(total+"<br>")
    document.write(num+"<br>")
    document.write(index+"<br>")
    document.write(arr+"<br>")

    document.write("<br>")
  return total - num;
}


// 출력

// 175
// 50
// 1
// 175,50,25

// 125
// 25
// 2
// 175,50,25

// 100


9. destructing


객체 내 변수를 쉽게 꺼내는 방법


기존

// 객체의 경우
var obj = {name: 'elice', age:5};
var name = obj.name;
var age = obj.age;

//배열의 경우
var arr = ['some', 'values'];
var first = arr[0];
var second = arr[1];


ES6

// 객체일 때
const obj = {name: 'elice', age: 5};

const {name, age} = obj;
const {name:n1, age:a1} = obj; // 이름 바꿔서 선언하고자 할 때


// 변수일 때
const arr = ['some', 'values'];
const [first, second] = arr;


반응형
반응형


네비게이션

메뉴 버튼 클릭 시 선택된 영역으로 스크롤 되면서 이동되는 내비게이션 기능

내비게이션 기능을 구현하기 위해서는 다음 6가지 요소가 어떠한 기능을 담당하는지 숙지해야 합니다.

  • querySelector: 1개의 태그를 css 선택자를 기반으로 가져옵니다.
  • querySelectorAll: 여러 개의 태그를 css 선택자를 기반으로 가져옵니다.
  • preventDefault() : 현재 이벤트의 기본 동작을 중지시킬 때 사용됩니다.
  • getAttribute : HTML 태그의 속성값을 가져올 때 사용합니다.
  • window.scrollTo({}) : 원하는 위치로 스크롤 이동을 시킬 때 사용됩니다.
  • offsetTop : 선택된 영역의 상단까지의 거리를 절대 좌표로 반환합니다.


// 1) Scroll Navigation

// <header> 내에 있는 <a> 가져옴
var aTags = document.querySelectorAll("header a");


for(var i = 0; i < aTags.length; i ++) {
    aTags[i].onclick = function(e) {
    	
        // 해당 태크의 본래기능을 정지시킴
        e.preventDefault();
        
        // href 속성을 가져온 다음, 그 href에 해당하는 id를 갖는 객체를 가져온다.
        var target = document.querySelector(this.getAttribute("href"));

        // 원하는 위치로 스크롤되도록 지정한다. 
        // top: 스크롤 이후 최상단에 어떤 좌표가 오게 되는지 
        window.scrollTo({
            'behavior': 'smooth',
            'top': target.offsetTop
        })
    }
}
반응형
반응형

자동 이미지 슬라이드


일정 시간을 기준으로 자동으로 이미지가 교체되는 이미지 슬라이드 기능

다음 2가지 요소가 어떠한 기능을 담당하는지 숙지해야 합니다.

  • setInterval() : 일정 시간마다 반복적으로 코드를 실행하고자 할 때 사용됩니다.
  • querySelector() : 선택된 요소의 자식 요소 1개를 찾을 때 사용됩니다.
  • querySelectorAll() : 선택된 요소의 자식 요소 여러 개를 찾을 때 사용됩니다.
  • animate(): 선택된 요소에 애니메이션을 적용할 때 사용합니다.


애니메이션 js 코드

slide.animate({
    marginLeft: ["0px", "1024px"]
}, {
    duration: 500,
    easing: "ease",
    iterations: 1,
    fill: "both"
});


주기적으로 애니메이션 반복하는 코드

// 2) Image Slider

var slider = document.querySelector("#slider");
var slides = slider.querySelector(".slides");
var slide = slides.querySelectorAll(".slide");

var currentSlide = 0;

// setInterval: 3000ms 간격으로 함수가 실행된다.
setInterval(function() {
    var from = -(1024 * currentSlide);
    var to = from - 1024;
    
    // 이미지 슬라이드 기능
    slides.animate({
        marginLeft: [from + "px", to + "px"]
    }, {
        duration: 500,
        easing: "ease",
        iterations: 1,
        fill: "both"
    });
    currentSlide++;
    
    // 마지막 이미지를 넘어선 경우, 첫 이미지로 되돌아 가도록 함.
    if (currentSlide === (slide.length - 1)) {
        currentSlide = 0;
    }
}, 3000);


클릭 이미지 슬라이드


화살표 버튼 클릭 시 Fade 효과가 적용된 이미지 슬라이드(2) 기능을 구현해 봅시다.

이미지 슬라이드(2) 기능을 구현하기 위해서는 다음 요소가 어떠한 기능을 담당하는지 숙지해야 합니다.

  • xxx.previousElementSibling : 이전 요소를 선택합니다.
  • xxx.nextElementSibling : 다음 요소를 선택합니다.
  • xxx.parentElement() : 부모 요소를 선택합니다.
  • xxx.firstElementChild() : 첫번째 자식 요소를 선택합니다.
  • xxx.lastElementChild() : 마지막 자식 요소를 선택합니다.


[HTML]

<section id="photo">

    <div class="title">
        <h2>사진</h2>
        <p>
            2018 엘리스 하트여왕 크로켓경기의 사진을 공개합니다.
        </p>
    </div>

    <div class="slider">

        <div class="slide active"></div>
        <div class="slide"></div>
        <div class="slide"></div>

    </div>

    <p class="left-arrow"></p>
    <p class="right-arrow"></p>

</section>


[왼쪽 화살표 클릭 기능]

// 4) Click Image Slider

//왼쪽 이미지 슬라이드 기능 구현
document.querySelector(".left-arrow").onclick = function() {

    // 현재 active 되어있는 slide가 currentSlide
    var currentSlide = document.querySelector("#photo .slide.active");
    var previousSlide = currentSlide.previousElementSibling;
    
    // 가장 왼쪽 슬라이드를 넘어선다면, 오른쪽 끝으로 이동되어짐
    if (previousSlide === null) {
        previousSlide = currentSlide.parentElement.lastElementChild;
    }
    
    // 스무스하게 현재 이미지가 넘어가도록 애니메이션 기능 추가
    currentSlide.animate({
        opacity: [1, 0]
    }, {
        duration: 500,
        easing: "ease",
        iterations: 1,
        fill: "both"
    });
    
    // 기존 슬라이드에서 active 제거
    currentSlide.classList.remove("active")
    
    // 스무스하게 이전 이미지가 넘어오도록 애니메이션 기능 추가
    previousSlide.animate({
        opacity: [0,1]
    }, {
        duration: 500,
        easing:"ease",
        iterations: 1,
        fill: "both",
    })
    
    // 이전 이미지에 active 추가함
    previousSlide.classList.add("active")
}


[오른쪽 화살표 클릭 기능]

document.querySelector(".right-arrow").onclick = function () {
    var currentSlide = document.querySelector("#photo .slide.active");
    var nextSlide = currentSlide.nextElementSibling;
    if (nextSlide === null) {
        nextSlide = currentSlide.parentElement.firstElementChild;
    }
    currentSlide.animate({
        opacity: [1, 0]
    }, {
        duration: 500,
        easing: "ease",
        iterations: 1,
        fill: "both"
    });
    currentSlide.classList.remove("active");
    nextSlide.animate({
        opacity: [0, 1]
    }, {
        duration: 500,
        easing: "ease",
        iterations: 1,
        fill: "both"
    });
    nextSlide.classList.add("active");
}


탭 버튼

탭 메뉴 클릭 시 배경 색상이 변경되고, 상세 내용이 나타나는 기능

  • xxx.classList.remove() : 선택된 태그의 특정 클래스 명을 제거합니다.
  • xxx.classList.add() : 선택된 태그의 특정 클래스 명을 추가합니다.
  • xxx.forEach(function(item){}): 선택된 여러 개의 태그에 특정 코드를 각각 실행시켜줍니다.

<HTML>

<div id="slider">
    <ul class="slides">
        <li class="slide"><img src="img/image1.jpg" alt=""></li>
        <li class="slide"><img src="img/image2.jpg" alt=""></li>
        <li class="slide"><img src="img/image3.jpg" alt=""></li>
        <li class="slide"><img src="img/image4.jpg" alt=""></li>
        <li class="slide"><img src="img/image5.jpg" alt=""></li>
        <li class="slide"><img src="img/image1.jpg" alt=""></li>
    </ul>
</div>


<div class="title">
    <h2>크로켓</h2>
    <p>잔디가 깔린 코트에서 나무망치로 볼을 때려 코트 안에 있는 후프(작은 문)를 통과시켜 타임 또는 득점을 겨룬다. 보통 2~4명으로 번갈아 타구하면서 진행한다. 골프의 그린 상에서 행하는 퍼트와 흡사한 경기이다. 여기에서는 영국에서 행하여 지고 있는 경기방법에 따라 해설하고 있다. </p>
</div>

<div class="tabs">
    <ul class="tabs-list">
        <li class="active"><a href="#tab1">소개</a></li>
        <li ><a href="#tab2">승패</a></li>
        <li ><a href="#tab3">아웃</a></li>
    </ul>

    <div id="tab1" class="tab active">
        <h3>소개</h3>
        <p>
            11명으로 구성된 2개조의 팀이 야구 경기와 같이 공격측과 수비측으로 나뉘어 볼을 타격하여 득점을 겨루는 경기로서 다음의 요령으로 행한다.
            ①필드의 중앙에 22야드(약20m)의 간격으로 2개의 위킷이 있으며, 공격측은 각 위킷에 배트를 가지고 1명씩 위치한다. 1명은 타자이고 다른 1명은 주자가 되는데 페어의 한 쪽이 아웃이 되면 타자가 되어 반대측의 위킷에서 볼을 친다.
            ②수비측의 볼러(투수)는 배트맨의 바로 앞에서 바운드할 듯이 볼을 던지지만 일반적으로 말하는 드로우가 아니라 팔을 완전히 뻗은 채로 최상위에서 밀어내듯이 볼을 던진다.
            ③배트맨이 볼을 치면, 배트맨과 반대의 위킷에 있는 주자도 동시에 달리기 시작하여 도중에서 엇갈려 각각 반대쪽의 위킷에 배트를 터치해서 되풀이하고, 볼이 위킷에 되돌아 오기 전에 이것을 몇 번이고 반복해서 득점을 올린다(반대쪽 위킷에 도착하면1점). 시합은 2이닝으로 끝나지만, 공격측이 10명 아웃이 되면 공수를 교대한다. 1명이 수백점을 얻는 수도 있고, 큰 시합에서는 5일, 작은 시합에서도 하루가 걸리는 장시간 게임이다.
        </p>
    </div>
    <div id="tab2" class="tab">
        <h3>승패</h3>
        <p>
            게임이 끝나고 득점이 많은 팀이 승자가 되지만, 득점은 다음과 같은 경우에 얻을 수 있다.
            ①타구한 볼이 위킷으로 되돌아오는 사이에 공격측의 2명이 서로 엇갈려 반대쪽 위킷에 배트를 터치하면 1점.
            ②타구한 볼이 노우 바운드로 필드의 경계선을 넘어가면 6점.
            ③바운드, 또는 땅볼로 경계선을 넘어가면 4점. ②③의 경우, 배트맨은 원위치로 되돌아오고, 경계선을 넘어간 득점만이 기록된다.
            ④볼러(투수)가 배트맨이 닿지 못할 정도로 높은 곳에 투구하거나 또는 위킷에서 벗어난 방향에 투구한 경우는 1점.
            ⑤볼이 배트맨의 손 이외의 몸에 닿고, 그것이 배트맨의 고의가 아닌 경우는 1점.
        </p>
    </div>
    <div id="tab3" class="tab">
        <h3>아웃</h3>
        <p>
            배트맨이 실격되는 것을 말하며 다음 경우에 아웃이 된다. ① 배트맨이 볼을 치지 못하고 볼이 위킷에 맞아 횡목을 떨어뜨린 경우. ② 타구가 지상에 떨어지기 전에 포구된 경우 ③타구가 되돌려 지고 주자가 위킷에 도착하기 전에 볼로 위킷의 횡목을 떨어뜨린 경우. ④ 배트맨이 볼에 손을 대거나 두 번 연거푸 치거나 수비 선수를 방해한 경우. ⑤ 배트맨이 타격 중 뛰어나갈 때 배트나 몸으로 횡목을 떨어뜨린 경우. ⑥ 타자가 목적도 없이 위치를 벗어나 위킷 키퍼가 횡목을 떨어뜨린 경우.
        </p>
    </div>

</div>


<javascript>

// 3) Tabs

var links = document.querySelectorAll(".tabs-list li a")
var items = document.querySelectorAll(".tabs-list li")

// <a> 기존의 기능을 중지시킴
for (var i = 0; i < links.length; i++) {
    links[i].onclick = function(e) {
        e.preventDefault() ;
    }
}

for (var i = 0; i < items.length; i++) {
    // 탭이 클릭 이벤트 발생시
    items[i].onclick = function() {
        var tabId = this.querySelector("a").getAttribute("href");
        console.log(this.classList);
        
        // (1) 기존에 있던 active 클래스 삭제
        document.querySelectorAll(".tabs-list li, .tabs div.tab").forEach(function(item) {
            item.classList.remove("active");
            console.log(item);
        });
        
        // (2) 클릭된 탭은 active 클래스 추가
        document.querySelector(tabId).classList.add("active");
        this.classList.add("active");
    }  
}


<css>

/* Tab Active */
.active{
    display:block !important;
}
.tabs .tabs-list li.active{
    background-color: #efeff6 !important;
    color:black !important;
}
.active a{
    color:black !important;
}


반응형
반응형

IndexedDB

IndexedDB는 SQL 기반 RDBMS와 같은 트랜잭션 데이터베이스 시스템으로,

상당한 양의 구조화된 데이터를 클라이언트 측 스토리지에 저장하기 위한 저수준 API이다.

다시 말해, 브라우저에서 구동되는 in broswer database이다.


특징

key-value storage의 저장구조를 가지고 있어서 사용하기 편리하다.

애플리케이션을 차단하지 않도록 비동기적으로 수행된다.


IndexedDB 사용하기

참고 링크


1. open 메서드 이용하여 데이터베이스를 생성합니다.

const request = indexedDB.open(databaseName, version);


// Let us open our database
const request = window.indexedDB.open("MyTestDatabase", 3);


open 메서드가 실행되면 IDBOpenDBRequest 객체를 리턴하여 result에 저장한다.

result를 이용해 정상 또는 오류를 처리하는 핸들러를 아래와 같이 정의한다. 

request.onerror = (event) => {
  // Do something with request.errorCode!
};
request.onsuccess = (event) => {
  // Do something with request.result!
};


IDBOpenDBRequest 객체의 onupgradeneeded 프로퍼티:

indexedDB의 open메서드를 사용할 때, 현재 버전보다 높은 버전을 사용하면 해당 프로퍼티에 설정한 함수가 실행된다.

// This event is only implemented in recent browsers
request.onupgradeneeded = (event) => {
  // Save the IDBDatabase interface
  const db = event.target.result;

  // Create an objectStore for this database
  const objectStore = db.createObjectStore("name", { keyPath: "myKey" });
  
  // other code 
  // ...
};

IDBOpenDBRequest 객체의 onsuccese 프로퍼티:

onupgradeneeded이벤트가 성공적으로 종료 되면 onsuccess데이터베이스 열기 요청의 핸들러가 트리거된다. 즉, indexedDB의 모든 요청이 정상적으로 끝나면 해당 프로퍼티에 설정한 함수가 실행된다. 


2. 데이터베이스에 객체 저장소를 만듭니다.

// This is what our customer data looks like.
const customerData = [
  { ssn: "444-44-4444", name: "Bill", age: 35, email: "bill@company.com" },
  { ssn: "555-55-5555", name: "Donna", age: 32, email: "donna@home.org" }
];

이렇게 생긴 객체를 만들기 위해서는 request.onupgradeneeded 안에 다음과 같은 로직이 필요하다.

여기서는 데이터베이스의 구조를 변경할 수 있는 유일한 곳으로, 객체저장소와 인덱스를 생성하고 삭제할 수 있다.

// This event is only implemented in recent browsers
request.onupgradeneeded = (event) => {
  // Save the IDBDatabase interface
  const db = event.target.result;

  // Create an objectStore for this database
  // Create an objectStore to hold information about our customers. We're
  // going to use "ssn" as our key path because it's guaranteed to be
  // unique - or at least that's what I was told during the kickoff meeting.
  const objectStore = db.createObjectStore("customers", { keyPath: "ssn" });

  // Create an index to search customers by name. We may have duplicates
  // so we can't use a unique index.
  objectStore.createIndex("name", "name", { unique: false });

  // Create an index to search customers by email. We want to ensure that
  // no two customers have the same email, so use a unique index.
  objectStore.createIndex("email", "email", { unique: true });
  objectStore.createIndex("index",{autoIncrement: true});
  
};

참고) autoIncrement라는 옵션은 자동으로 객체 프로퍼티에 Key를 정수로 1부터 부여


3. 트랜잭션을 시작하고 데이터 추가 또는 검색과 같은 일부 데이터베이스 작업을 수행하도록 요청합니다.


데이터 추가

const transaction = db.transaction(["customers"], "readwrite");


데이터 삭제

const request = db
  .transaction(["customers"], "readwrite")
  .objectStore("customers")
  .delete("444-44-4444");
request.onsuccess = (event) => {
  // It's gone!
};


4. 객체 스토어에서 데이터 모두 가져오기

개체 저장소에 있는 모든 개체의 배열을 얻으려면 getAll() 을 사용한다.

objectStore.getAll().onsuccess = (event) => {
  console.log(`Got all customers: ${event.target.result}`);
};


Create

export function createIndexedDB(databaseName, version, objectStore, cb) {
  if (window.indexedDB) {
    const request = indexedDB.open(databaseName, version);

    request.onupgradeneeded = function () {
      request.result.createObjectStore(objectStore, { autoIncrement: true });
    };

    request.onsuccess = function () {
      cb();
    };
  }
}

Insert

export function insertIndexedDB(databaseName, version, objectStore, data, cb) {
  if (window.indexedDB) {
    const request = indexedDB.open(databaseName, version);

    request.onsuccess = function () {
      const store = request.result
        .transaction(objectStore, 'readwrite')
        .objectStore(objectStore);
      store.add(data).onsuccess = function () {
        cb();
      };
    };
  }
}


Read All Index

export function getAllIndexedDB(databaseName, version, objectStore, cb) {
  if (window.indexedDB) {
    const request = indexedDB.open(databaseName, version);

    request.onsuccess = function () {
      const store = request.result
        .transaction(objectStore, 'readwrite')
        .objectStore(objectStore);
      store.getAll().onsuccess = function (response) {
        cb(response.target.result);
      };
    };
  }
}


Read One

export function getIndexedDB(databaseName, version, objectStore, id, cb) {
  if (window.indexedDB) {
    const request = indexedDB.open(databaseName, version);
    const key = Number(id);

    request.onsuccess = function () {
      const store = request.result
        .transaction(objectStore, 'readwrite')
        .objectStore(objectStore);
      store.get(key).onsuccess = function (response) {
        cb(response.target.result);
      };
    };
  }
}


Update

export function updateIndexedDB(
  databaseName,
  version,
  objectStore,
  id,
  data,
  cb
) {
  if (window.indexedDB) {
    const request = indexedDB.open(databaseName, version);
    const key = Number(id);

    request.onsuccess = function () {
      const store = request.result
        .transaction(objectStore, 'readwrite')
        .objectStore(objectStore);
      store.get(key).onsuccess = function (response) {
        const value = response.target.result;
        value.content = data;
        store.put(value, key).onsuccess = function () {
          cb();
        };
      };
    };
  }
}


delete

export function deleteIndexedDB(databaseName, version, objectStore, id, cb) {
  // deleteIndexedDB 함수를 완성해주세요.
  if (window.indexedDB) {
    const request = indexedDB.open(databaseName, version);
    const key = Number(id);

    request.onsuccess = function () {
      const store = request.result
        .transaction(objectStore, 'readwrite')
        .objectStore(objectStore);
      store.delete(key).onsuccess = function (response) {
        cb();
      };
    };
  }
}


Read All Key


export function getAllKeysIndexedDB(databaseName, version, objectStore, cb) {
  // getAllKeysIndexedDB 함수를 완성해주세요.

  if (window.indexedDB) {
    const request = indexedDB.open(databaseName, version);

    request.onsuccess = function () {
      const store = request.result
        .transaction(objectStore, 'readwrite')
        .objectStore(objectStore);
      store.getAllKeys().onsuccess = function (response) {
        cb(response.target.result);
      };
    };
  }
}
반응형
반응형

이미지 파일 업로드하기

포스트를 추가하는 화면에서 이미지 파일을 업로드하는 기능


FileReader

(1) 파일을 읽기 위해 FileReader 객체를 생성

let reader = new FileReader();

 
(2) FileReader 객체에서 제공하는 readAsDataURL 메서드를 이용해 input 태그를 이용해 업로드된 파일을 넘겨줄 수 있다.

reader.readAsDataURL(inputElement.files[0]);


(3) input 태그가 type="file"이면 <input type="file" name="file" id="file" />

input 요소에 files로 접근하면 사용자가 선택해서 읽은 파일에 대한 정보를 얻어낼 수 있다.
FileReader에 readAsDataURL 메서드를 실행한 후 정상적으로 파일을 읽었을 때는 다음과 같이 onload 메서드에 함수를 넣어 코드 흐름을 제어할 수 있다. 

reader.onload = function() {
  /* source code... */ 
  
}


만약 파일을 읽다가 에러가 발생한다면 onerror 메서드에 함수를 넣어 코드 흐름을 제어한다.

reader.onerror = function() {
  /* source code... */ 
  
}


svg 이미지 파일 import하기

import close from './assets/close_icon.svg';
import media from './assets/media_icon.svg';
import arrow from './assets/arrow_back_icon.svg';


이미지를 업로드하는 modal 창의 HTML 코드 (modal__card)

const modal = `
                <div class="modal__close">
                  <img
                  width="22px"
                  height="22px"
                  src=${close}
                  alt="close_icon_logo"
                  />
                </div>
                <div class="modal__card">
                  <div class="modal__header">
                    <div class="modal__back">
                      <img width="32px" height="24px" src=${arrow} alt="arrow_back_icon" />
                    </div>
                    <h2>새 게시물 만들기</h2>
                    <p>공유하기</p>
                  </div>
                  <div class="modal__main">
                    <img src=${media} alt="media_icon" />
                    <h3>사진과 동영상을 업로드 해보세요.</h3>
                    <label for="file">
                      <p>컴퓨터에서 선택</p>
                    </label>
                    <input type="file" name="file" id="file" />
                  </div>
                </div>
              `;


업로드된 이미지를 포함한 포스팅용 모달창 HTML 코드 (modal__post)

function createPost(img) {
  return `
          <div class="modal__post">
            <img width="478px" height="478px" src=${img} alt="image" />
            <div class="modal__write">
              <textarea placeholder="문구 입력..." autofocus></textarea>
            </div>
          </div>
        `;
}


index.html 내 id = add-post 인 버튼을 클릭하면 실행될 함수를 등록 (addEventListener) 

document.querySelector('#add-post').addEventListener('click', createModal);


  1. createPost 함수는 미리 작성되어 있습니다. 해당 함수에서 리턴되는 HTML 템플릿은 포스트 추가 버튼을 클릭 후 모달창에서 이미지를 업로드 했을 때, 적용되어야 합니다.
  2. 이미지 파일을 업로드하도록 id file인 요소를 선택합니다.
  3. 선택한 file 요소에 이미지가 input 되었을 때, 이벤트 핸들러를 등록합니다.
  4. 파일을 읽을 수 있도록 FileReader() 생성자 함수를 이용해 새로운 객체를 만듭니다.
  5. 만든 객체에서 readAsDataURL 메서드를 이용해 이미지 파일을 base64로 인코딩 합니다.
  6. base64로 인코딩된 이미지 파일이 load 되었을 때, 실행할 함수를 작성합니다.
    • 이미지 로드가 완료되면, result 프로퍼티를 통해 접근 할 수 있습니다.
    • .modal__card 요소에 클래스를 modal__card write--post로 변경합니다.
    • .modal__main 요소에 클래스를 modal__main write--post로 변경합니다.
    • .modal__back > img 요소와 .modal__header > p 요소를 선택하여 해당 요소들의 visibility visible로 바꿉니다.
    • .modal__main 요소에 createPost함수를 사용하여 템플릿을 삽입합니다. 함수 인자에는 업로드한 이미지를 넣습니다.
    • .modal__back > img 요소를 클릭했을 때, 현재 모달창을 닫고, 다시 새로운 모달창을 열도록 해줍시다.
  7. base64로 인코딩된 이미지 파일이 error 되었을 때, 실행할 함수를 작성합니다.
    • alert을 통해 에러 메세지를 출력합니다.
    • 모달창을 닫습니다.
    // 지시사항에 맞춰 코드를 작성해주세요.
    const fileEl = document.querySelector('#file');
    fileEl.addEventListener("input", function() {
        const reader = new FileReader();
        reader.readAsDataURL(fileEl.files[0]);
        reader.onload = function() {
            /* source code... */ 
            const imageBase64 = reader.result;

            document.querySelector(".modal__card")
            .setAttribute("class", "modal__card write--post")
            document.querySelector(".modal__main")
            .setAttribute("class", "modal__main write--post")

            const backBtn = document.querySelector(".modal__back > img")
            const shareBtn = document.querySelector(".modal__header > p")
            backBtn.style.visibility = "visible"
            shareBtn.style.visibility = "visible"

            document.querySelector(".modal__main").innerHTML = createPost(imageBase64)
            backBtn.addEventListener("click", function(){
                document.body.removeChild(modalEl)
                createModal();
            })

        }
        reader.onerror = function(error) {
            /* source code... */ 
            alert("Error", error)
            document.body.removeChild(modalEl);
        }
    })


모달창 모듈화

모달 창을 만드는 HTML코드로, 함수로 만들어 모듈화 한 것이다.

function modalTemplate() {
    return `<div class="modal__close">
                <img
                width="22px"
                height="22px"
                src=${close}
                alt="close_icon_logo"
                />
            </div>
            <div class="modal__card">
                <div class="modal__header">
                <div class="modal__back">
                    <img width="32px" height="24px" src=${arrow} alt="arrow_back_icon" />
                </div>
                <h2>새 게시물 만들기</h2>
                <p>공유하기</p>
                </div>
                <div class="modal__main">
                <img src=${media} alt="media_icon" />
                <h3>사진과 동영상을 업로드 해보세요.</h3>
                <label for="file">
                    <p>컴퓨터에서 선택</p>
                </label>
                <input type="file" name="file" id="file" />
                </div>
            </div>`;
}


위 HTML 코드 내에서 <input>에서 받아온 데이터는 parsing( base64로 변환되는 로직)을 거쳐야 한다. 

이때  아래와 같은 readfile() 함수를 이용해 

정상데이터면 콜백함수에 전달하고, 오류 데이터면 error객체를 전달한다.

// 지시사항에 맞춰 readFile 매개변수를 작성하고, readAsDataURL에 인자를 전달하세요.
// 두 개의 매개변수 file, cb을 받습니다. 여기서 cb는 콜백함수를 의미합니다.
function readFile(file, cb) {
  let reader = new FileReader();

  // 내부에서는 새로운 FileReader 객체를 만들고 readAsDataURL 메서드로 파일을 읽습니다.
  reader.readAsDataURL(file);
  
  // onload 프로퍼티에서는 콜백함수 매개변수에 base64로 변환된 이미지를 전달해주세요.
  reader.onload = function () {
    // 지시사항에 맞춰 코드를 작성하세요.
    cb(reader.result)
  };


// onerror 프로퍼티에서는 콜백함수 매개변수에 error 객체를 전달해주세요.
  reader.onerror = function (error) {
    cb(error)
  };
}


  • 콜백 함수는 비동기 처리가 끝난 후 사용되는 코드 패턴입니다.
  • 자바스크립트 비동기 로직은 특정 코드 흐름을 현재 실행중인 자바스크립트 프로그램에서 작업하지 않고 다른 곳에서 작업합니다. 그리고 그 작업이 끝난 후에 결과를 현재 자바스크립트 프로그램에서 가져오는 과정을 말합니다.


반응형
반응형


이벤트

웹 브라우저가 알려주는 HTML 요소에 대한 사건의 발생.

자바스크립트는 발생한 이벤트에 반응하여 특정 동작을 수행할 수 있다.


이벤트 타입

폼, 키보드, 마우스, HTML DOM, Window객체 등


이벤트 핸들러

이벤트가 발생했을 때, 그 처리를 담당하는 함수이다.

지정된 이벤트가 발생하면, 웹브라우저는 그 요소에 등록된 이벤트 핸들러를 실행시킨다.


이벤트 핸들러 등록

작성된 이벤트 핸들러는 먼저 해당 객체나 요소에 등록되어야만 호출될 수 있다.

객체나 요소에 이벤트 핸들러를 등록하는 방법은 크게 2가지다.


1. 자바스크립트 코드에서 프로퍼티로 등록하는 방법 : window.onload

window.onload = function() { } // 이 함수는 HTML 문서가 로드될 때 실행됨.

2. HTML 태그에 속성으로 등록하는 방법 : onclick   innerHTML

<p onclick="this.innerText = '클릭!'">클릭해 보세요!</p>

3. addEventListener 사용법 : 대상객체.addEventListener(이벤트명, 실행할 이벤트 핸들러, 이벤트 전파방식)

// 1. 아이디가 "carrot"인 요소를 선택하세요
var carrot_btn = document.getElementById('carrot'); 

// 2. click 할 시 텍스트를 보여주는 함수를 작성합니다.
//    버튼을 클릭하면 "토끼가 나타났어요!!" 문장을 출력하도록 해보세요

function showText() {
    document.getElementById("text").innerHTML = "토끼가 나타났어요!!";

};

// 3. 선택한 요소에 "click" 이벤트 핸들러를 등록하세요 (이벤트명:"click", 함수이름)
carrot_btn.addEventListener("click", showText) ;


반응형
반응형

노드(Node)

HTML DOM에서 정보를 저장하는 계층적 단위


노드 트리

노드들의 집합으로, 노드 간의 관계를 나타낸다.

자바스크립트에서는 HTML DOM을 이용하여 노드 트리에 포함된 모든 노드에 접근할 수 있다.


노드의 종류

문서 노드(document node)

요소 노드(element node)

주석 노드(comment node)

속성 노드(attribute node)

텍스트 노드(text node)


노드의 값

프로퍼티를 이용해 노드 정보에 접근할 수 있다.

nodeName(이름), nodeValue(값), nodeType(타입)

document.childNodes[ ] : 자식노드에 접근

document.nodeName :노드명 접근

// 1. document 의 자식 노드들 중 두번째 노드를 node1변수에 할당하도록 코드를 작성하세요.
var node1 = document.childNodes[1];

// 2. node1의 자식 노드들 중 세번째 노드를 node2변수에 할당하도록 코드를 작성하세요.
var node2 = node1.childNodes[2];

// 3. node2의 자식 노드들 중 두번째 노드를 node3변수에 할당하도록 코드를 작성하세요.
var node3 = node2.childNodes[1];

// 4. node1, node2, node3의 이름을 nodeName을 이용해 출력하도록 코드를 작성하세요.

document.write(node1.nodeName);
document.write(node2.nodeName);
document.write(node3.nodeName);

//5. `node2`의 자식 변수들을 모두 출력해봅니다.
console.log(node2.childNodes);

firstChild.nodeValue :노드 값 접근

// 1. document.getElementById()를 사용하여 아이디가 apple인 요소를 선택하도록 코드를 작성하세요.
var apple_node = document.getElementById('apple');

// 2. firstChild.nodeValue를 사용하여 node의 첫번째 자식 노드의 값을 `apple_pie`로 변경하도록 코드를 작성하세요.
apple_node.firstChild.nodeValue = 'apple_pie' ;


반응형
반응형

문서 객체 모델 DOM (Document Object Model) 

DOM은 XML이나 HTML 문서의 프로그래밍 인터페이스로, 객체 지향 모델로써 구조화된 문서를 표현하는 형식이다.

즉, 소스 코드 내 객체들을 트리 구조로 표현하는 형식


HTML DOM

HTML 문서를 조작하고 접근하는 표준화된 방법.

즉, 모든 HTML 요소를 조작하고 접근하고자 할 때, HTML DOM을 통해 접근이 가능하다.


Document method

HTML 요소와 관련된 작업을 도와주는 다양한 메서드를 제공한다.

1. 선택 메서드

document.getElementById()

document.getElementByClassName()

document.getElementByName()

document.querySelectorAll()

document.querySelector()


2. 생성 메서드

document.createElement()

document.write()


3. 이벤트 핸들러 추가

요소.click = function( ) { ... }


[DOM 요소 선택]

// HTML <img> 요소를 선택하도록 코드를 작성하세요.
var imgs = document.getElementsByTagName("img");

// HTML <div> 요소를 선택하도록 코드를 작성하세요.
var selectedTagName = document.getElementsByTagName("div");

// 아이디가 “gtomato"인 요소를 선택하도록 코드를 작성하세요.
var selectedId = document.getElementById("gtomato");

// 클래스가 "vegetable"인 모든 요소를 선택하도록 코드를 작성하세요.
var selectedClassNameS = document.getElementsByClassName("vegetable");

// name 속성값이 "tomato"인 모든 요소를 선택하도록 코드를 작성하세요.
var selectedNameS = document.getElementsByName("tomato");

// 선택된 요소들을 출력합니다. 출력 순서를 변경하면 오답 처리가 됩니다.
document.write(imgs + "<br>");
document.write(imgs[0] + "<br>");
document.write(selectedTagName + "<br>");
document.write(selectedId + "<br>");
document.write(selectedClassNameS + "<br>");
document.write(selectedNameS[0] + "<br>");

document.write(selectedTagName[1].textContent + "<br>");
document.write(selectedId.textContent + "<br>");
document.write(selectedClassNameS[2].textContent + "<br>");
document.write(selectedNameS[0].textContent + "<br>");


DOM 트리 구조


자주 쓰이는 자바스크립트 선택 메서드 : getElementsByTagName

<!DOCTYPE html>
<html>
<head>
  <meta charset="UTF-8">
  <title>자바스크립트 기초</title>
</head>
<body>

    <div name="red"  class="fruit" id="apple">apple</div>
    <div name="yellow"  class="fruit" id="banana">banana</div>
    <div name="red"  class="vegetable" id="carrot">carrot</div>
    <div name="white"  class="vegetable" id="onion">onion</div>

<script src="index.js"></script>
  
</body>
</html>
// alert("Hello world!");


// HTML <div> 요소를 선택하도록 코드를 작성하세요
var selectedTagName = document.getElementsByTagName('div');

// 아이디가 “banana"인 요소를 선택하도록 코드를 작성하세요
var selectedId = document.getElementById('banana') ;

// 클래스가 "vegetable"인 모든 요소를 선택하도록 코드를 작성하세요
var selectedClassNameS = document.getElementsByClassName('vegetable'); 

// name 속성값이 "red"인 모든 요소를 선택하도록 코드를 작성하세요
var selectedNameS = document.getElementsByName('red'); 


// 선택된 요소들을 출력합니다.
document.write(selectedTagName);
document.write(selectedId);
document.write(selectedClassNameS);
document.write(selectedNameS);


DOM 요소의 스타일 변경: selectedId.style.colo

// 아이디가 "apple"인 요소를 선택하도록 코드를 작성하세요
var selectedId = document.getElementById("apple");

// 선택한 요소의 색깔을 red로 바꿉니다.
selectedId.style.color = "red"; 

// 아이디가 "banana"인 요소를 선택하도록 코드를 작성하세요
var selectedId = document.getElementById("banana");

// 선택한 요소의 색깔을 yellow로 바꿉니다.
selectedId.style.color = "yellow";


DOM 요소의 내용 변경: innerHTML

// 아이디가 "apple"인 요소를 선택하도록 코드를 작성하세요
var selectedId = document.getElementById('apple');

// 선택한 요소의 내용을 "strawberry"로 바꿉니다.
selectedId.innerHTML = "strawberry"; 

// 아이디가 "onion"인 요소를 선택하도록 코드를 작성하세요
var selectedId = document.getElementById('onion');

// 선택한 요소의 내용을 "garlic" 바꿉니다.
selectedId.innerHTML = "garlic";


반응형

+ Recent posts